It’s time for the third and last part of our node parameterization mini-series. In the second part, we created a device that connected to a serial port and grabbed data from the hardware. The device was configured based on a set of parameters that were read at runtime. Regardless of the type of hardware the device connected to, it would always read the data and publish them to a topic as they are. But what if we wanted to parse these data and publish them in the appropriate type of message? So instead of
> rostopic echo -c /sonar_front
data: "Hello from SonarFront: 28142"
---
we get
> rostopic echo -c /sonar_front
header:
  seq: 109
  stamp:
    secs: 1555757292
    nsecs: 880762949
  frame_id: "front_sonar_link"
radiation_type: 0
field_of_view: 0.10000000149
min_range: 0.00999999977648
max_range: 2.0
range: 2.99099993706
---
Can we still have one single device and yet make it process and publish different types of data based on the associated hardware? Yes, we can. Plugins will come to the rescue. As always, there is an accompanying repository which you can download and try things yourself.
Introduction
Have you ever used nodelets, the laser pipeline, or ros control? With nodelets, the nodelet manager can take different forms depending on the nodelets that are loaded at runtime; that’s made possible without any changes in the code. Similarly, with ros control, you can choose to use position or effort controllers for your robot and the controller manager will accommodate for that without the need to recompile anything.
Both managers accomplish this by making use of plugins. They load instances of classes from runtime libraries. pluginlib offers this functionality in ROS. You can read more about it in its main page and the tutorial Writing and Using a Simple Plugin. In essence, all you have to do to write a plugin is to
- define a class interface, e.g.
BasePublisher, - implement this interface and register the class as a plugin, e.g.
RangePublisher, - and declare the list of plugins, e.g. in
device_publisher_plugins.xml.
Then to use a plugin you just have to
- get a pluginlib class loader, e.g.
pluginlib::ClassLoader<publisher::BasePublisher>, - and ask the loader to create an instance of a plugin by name, e.g.
publisher_loader_.createInstance("device_publishers/RangePublisher").
Once you have the object in your hands, you can initialize it as usual by feeding it with the appropriate node handle (the plugin will still be initialized based on a configuration file; nothing changes here). Let’s now see an application of plugins on our running example of device drivers.
Preparation
First, please go through the preparation steps of the second part to set up the virtual serial ports (ttyIMU, ttyIMU0, ttySonarFront, ttySonarFront0, ttySonarRear, ttySonarRear0).
This time though, we will change the input loop. Before, since we didn’t have a way to process different types of data, we were writing a dummy message on the serial ports, like Hello from SonarFront: 28142. But now we will fix this. An IMU can provide three kinds of information: orientation, angular velocity, and linear acceleration. On the other hand, a sonar device gives just a distance measurement. We will assume all hardware to send their data as a comma-separated list of values. So, for the IMU, this would be for example "0.7965,0.6923,0.7901,0.4467,0.1940,0.0904,0.8649,0.0851,0.9330\n", and for the Sonar, "7.8236\n". To do this, we execute the following loop:
function get_random {
  awk -v n=$1 -v scale=$2 -v seed="$RANDOM" 'BEGIN { srand(seed); for (i=0; i<n; ++i) { printf("%.4f", scale*rand()); if (i<n-1) printf(","); else printf("\n"); } }'
}

while true; do
  get_random 9 1 > ~/dev/ttyIMU0;
  get_random 1 10 > ~/dev/ttySonarFront0;
  get_random 1 10 > ~/dev/ttySonarRear0;
  sleep 0.02;  # 50 Hz
done
One additional dependency compared to last time is the ros_node_configuration package. We need to download it and have it in our workspace:
# cd to <catkin_ws>/src
git clone https://github.com/nlamprian/ros_node_configuration.git
The ros_node_transformation package will read the SerialHandler class from ros_node_configuration as the handler stays unaffected by our changes and doesn’t need to be copied over.
Design
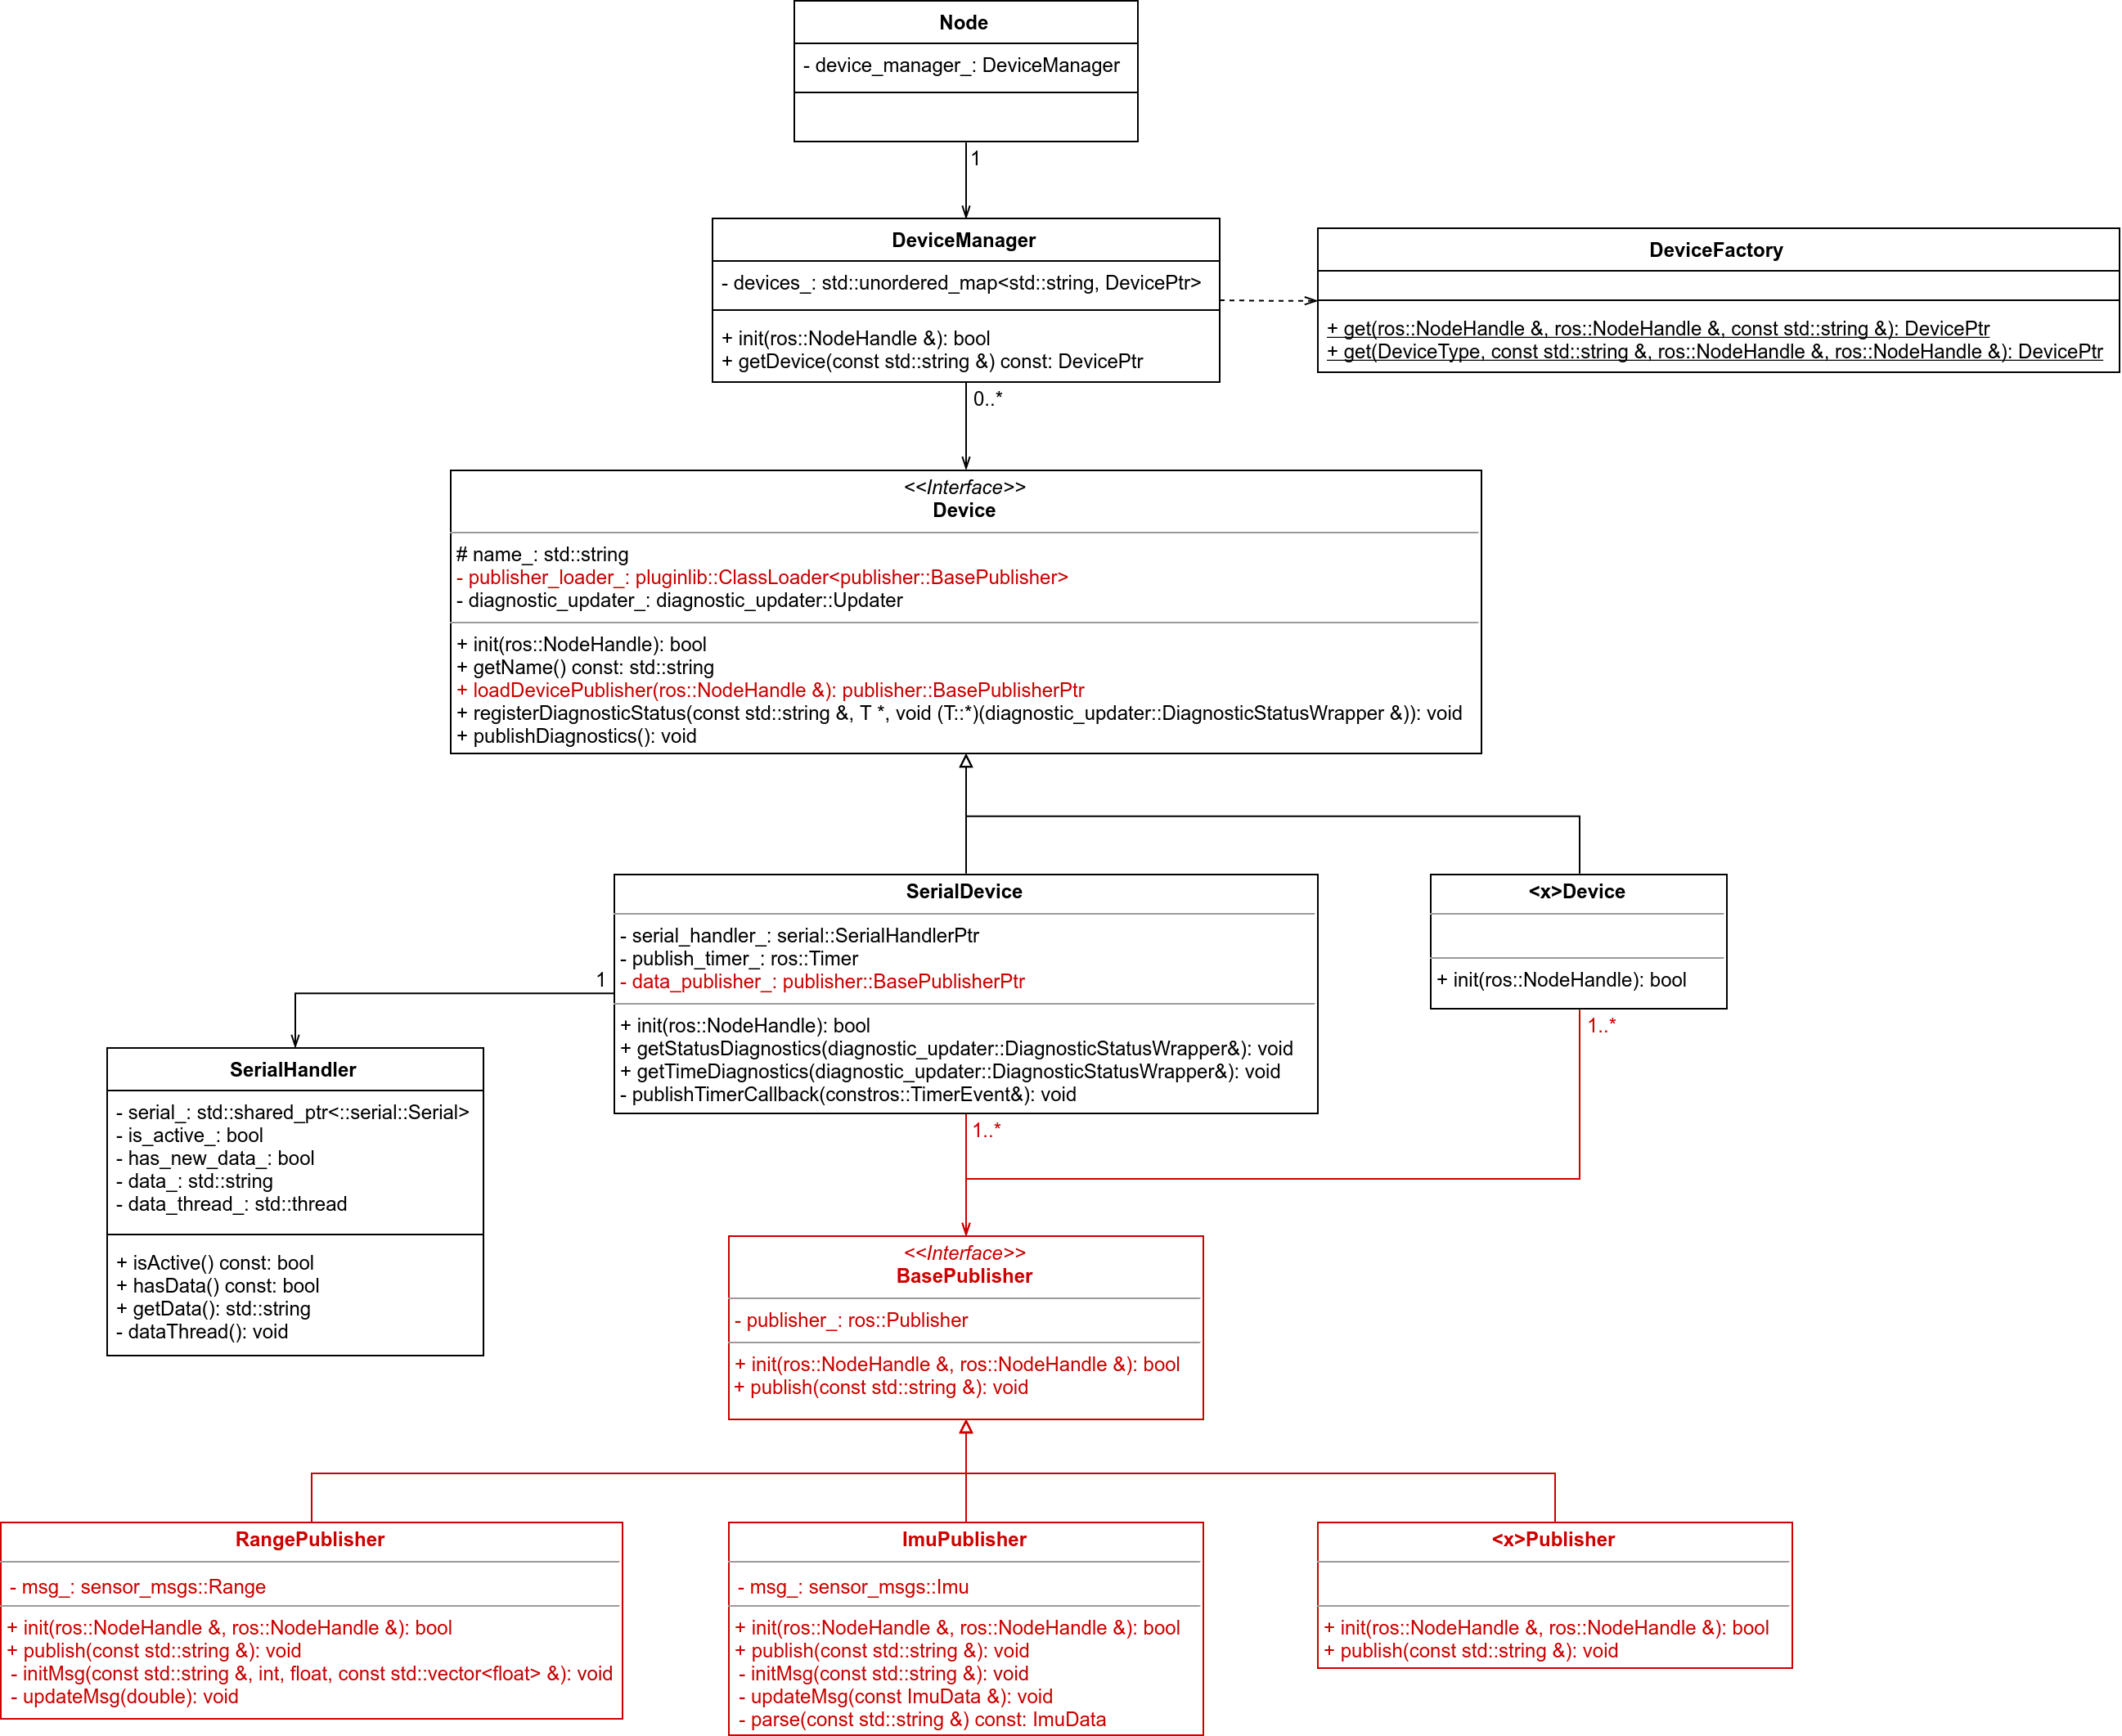
The limitation of our last design was that a device had no way of adapting to the hardware with which it was associated. All instances of SerialDevice were publishing std_msgs/String messages. Instead, we would like for a device connected to an IMU to publish sensor_msgs/Imu messages, and for a device connected to a Sonar to publish sensor_msgs/Range messages. In order for the devices to do this, they would have to know how to parse the incoming data, populate a message and publish it to a topic. So, our goal now will be to encapsulate all this functionality in a class hierarchy which we will turn into plugins. Then, upon initialization, a device will load the appropriate device publisher based on the given configuration and thus be able to adapt to the specifications.

In the diagram above, the new additions have been marked red. Basically, the publisher::BasePublisher in SerialDevice replaced the ros::Publisher which is now owned by the publisher::BasePublisher. The loadDevicePublisher method was added in Device which uses a pluginlib::ClassLoader<publisher::BasePublisher> to create an instance of a device publisher which is then initialized and returned to the caller. Finally, the device publishers do everything they need to parse a string command, construct a message and publish it to a topic.
Implementation
Let’s take a look at a few points of interest in the implementation. Firstly, we define the Publisher hierarchy as normal and then we register the publishers as plugins in their cpp files:
#include <pluginlib/class_list_macros.h>
PLUGINLIB_EXPORT_CLASS(device::publisher::ImuPublisher, device::publisher::BasePublisher)
PLUGINLIB_EXPORT_CLASS(device::publisher::RangePublisher, device::publisher::BasePublisher)
And that’s it; nothing else in the code says “I am a plugin”. Next we specify the list of device publishers in device_publisher_plugins.xml:
<library path="lib/libros_node_transformation_device_publisher_plugins">
  <class name="device_publishers/ImuPublisher" type="device::publisher::ImuPublisher" base_class_type="device::publisher::BasePublisher">
    <description>Device publisher for an IMU device.</description>
  </class>
  <class name="device_publishers/RangePublisher" type="device::publisher::RangePublisher" base_class_type="device::publisher::BasePublisher">
    <description>Device publisher for a Range device.</description>
  </class>
</library>
<x> in path="lib/lib<x>" is the name of the library we created in CMakeLists.txt and contains the publishers. The name attribute in the class tag is what we will later use to specify that we want an instance of the class in the type attribute. Lastly, we need to make the plugins known to ROS by exporting them in package.xml:
<export>
  <ros_node_transformation plugin="${prefix}/device_publisher_plugins.xml" />
</export>
Then, in order to load a plugin, Device has a pluginlib::ClassLoader which is what delivers the publishers when requested:
pluginlib::ClassLoader<publisher::BasePublisher> publisher_loader_("ros_node_transformation", "device::publisher::BasePublisher");
publisher::BasePublisherPtr publisher = publisher_loader_.createInstance("<type>");
Launching the nodes is exactly the same as before:
<node name="node_a" pkg="ros_node_configuration" type="devices_node">
  <rosparam file="$(find ros_node_configuration)/config/node_a_config.yaml" command="load" />
</node>

<node name="node_b" pkg="ros_node_configuration" type="devices_node">
  <rosparam file="$(find ros_node_configuration)/config/node_b_config.yaml" command="load" />
</node>
What needs to be updated is the configuration files:
devices:
  names: [sonar_front, sonar_rear]
  sonar_front:
    type: serial
    port: ~/dev/ttySonarFront
    publish_rate: 20
    hardware_id: sonar_front
    diagnostic_period: 1.0
    publisher:
      type: device_publishers/RangePublisher
      topic_name: sonar_front
      frame_id: front_sonar_link
      radiation_type: 0
      field_of_view: 0.1
      limits: [0.01, 2.0]
  sonar_rear:
    ...
A new publisher namespace is added in each device configuration. There, we put the publisher type, the name of the topic that publishes the data and anything else that is necessary for populating a message. A publisher reads these parameters and initializes itself.
Results
If we execute the launch file, we will see 3 devices being created as before:
> roslaunch ros_node_transformation bringup.launch
[ INFO] [1555235587.994927079]: SerialHandler: Opened port /home/nlamprian/dev/ttyIMU
[ INFO] [1555235587.997787139]: SerialDevice[imu]: Initialized successfully
[ INFO] [1555235587.999776285]: SerialHandler: Opened port /home/nlamprian/dev/ttySonarFront
[ INFO] [1555235588.001442668]: SerialDevice[sonar_front]: Initialized successfully
[ INFO] [1555235588.004508451]: SerialHandler: Opened port /home/nlamprian/dev/ttySonarRear
[ INFO] [1555235588.005816399]: SerialDevice[sonar_rear]: Initialized successfully
The same nodes and topics will be present in the ROS network:
> rostopic list
/diagnostics
/imu
/rosout
/rosout_agg
/sonar_front
/sonar_rear
But now the topics have different types:
> rostopic info /sonar_front
Type: sensor_msgs/Range

Publishers:
 * /node_b (http://nlamprian-aero:33023/)

Subscribers: None
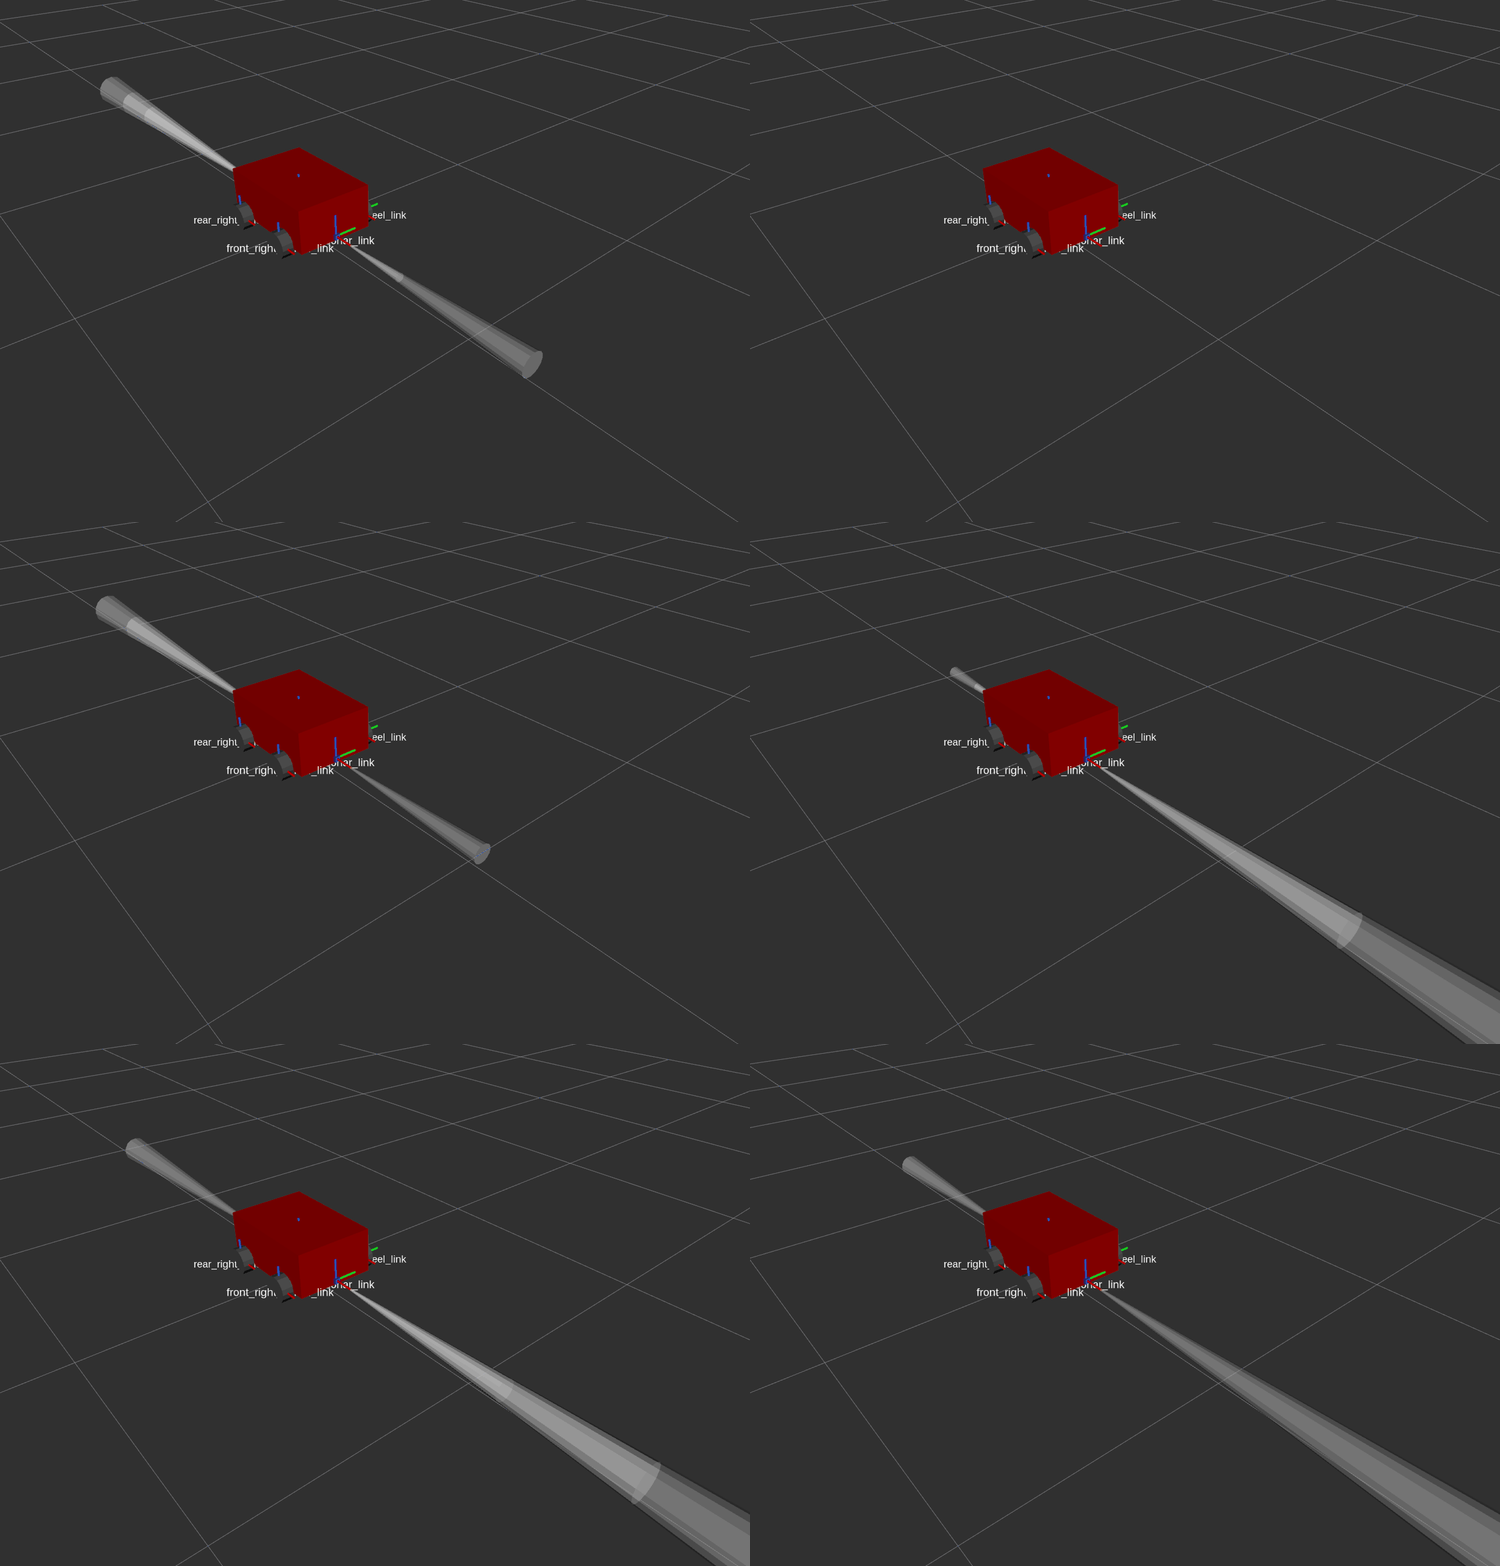
We can echo the topics to view the data, or visually inspect them in rviz by setting the start_rviz flag to true during launch:
> roslaunch ros_node_transformation bringup.launch start_rviz:=true

Conclusion
I hope you have enjoyed this series on the parameterization of ROS nodes. We started with fixed and cumbersome nodes which we made more flexible by extracting parameters from them. We then used configuration files to initialize these parameters and be able to define different instances of a node. In the end, we used plugins to further extend the potential of parameterization by allowing a class to transform and adapt to different scenarios.
Now that we know how to better structure our code when simulating a system, we are free to return to Gazebo. Next time, we will see how we can create a virtual world and build a map for it.