I’ve been planning on setting up my own NAS for quite some time, and this holiday season, I managed to do it. I’ve been hesitating to bootstrap the project, thinking I would have to spend a lot of time on it. Interestingly enough, I did spend a lot of time, but not on the NAS itself. I built my NAS on TrueNAS Core. One of the many services that TrueNAS offers is an OpenVPN server. Getting it to work, though, is a bit tricky. Thankfully, the TrueNAS community has already provided everything one might need. So, let’s do it.
The Goal
I want to access my files, and all my services, both locally and through the VPN. There are already great resources, by SpaceRex and Techworks, for setting up everything that most people seem to follow. Some of those people also claim that they managed to get the VPN to work. This hasn’t been my own experience. When I followed SpaceRex’s instructions, I would connect to the VPN, but I would have no access to my files. When I followed Techworks’ instructions, I would connect to the VPN and have access to my files, but locally, I could not access the Internet. There are plenty of comments and discussions in forums, old and new, but none of them seemed to help me. After many hours spent, I thought, wait one minute, there is also an OpenVPN plugin from the FreeNAS era. I should use that as a reference! And that sure did the trick.
The Solution
Follow the instructions by SpaceRex and Techworks to set up the certificate authority, the server and client certificates, and the client config, and skip everything else. There is no reason for me to repeat this information here. That should be enough to get a client successfully connected to the VPN. The rest of the instructions will build up on Techworks’ work, but adapt a few things.
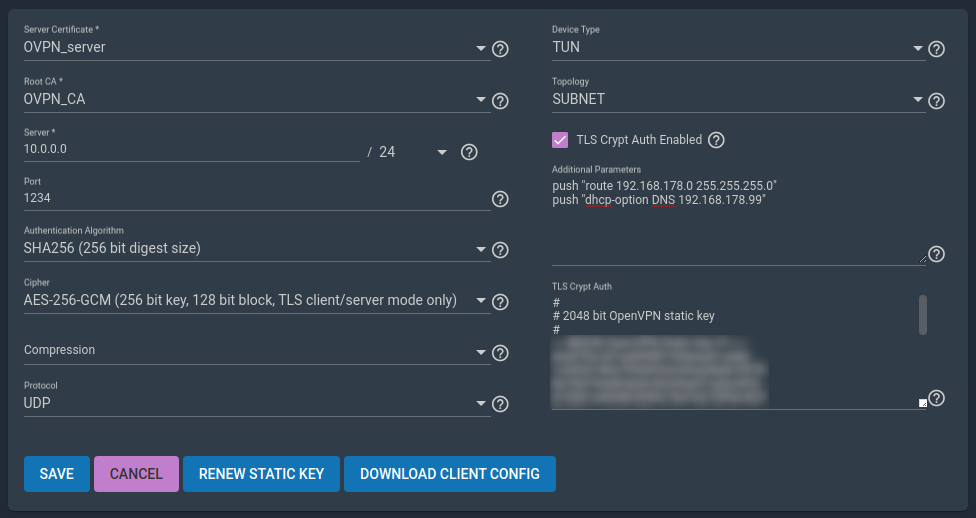
OpenVPN Configuration
Go to Services/OpenVPN Server. We’ll add the following configuration in the Additional Parameters field. This is extra configuration that’s appended to the openvpn.conf file. The first line is the route to the local subnet 192.168.178.0/24 and the second one is a local DNS server 192.168.178.99. If you don’t have your own DNS server, you can probably skip this line, or set it to the DNS of your gateway. Adjust the values according to your case.
push "route 192.168.178.0 255.255.255.0"
push "dhcp-option DNS 192.168.178.99"
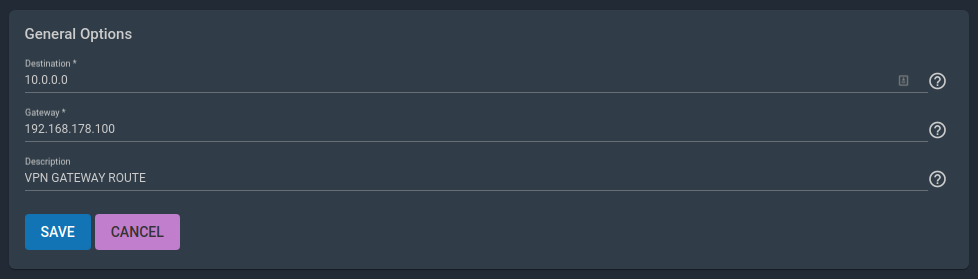
Static Route
Next, go to Network/Static Routes. Configure a route from the client subnet 10.0.0.0/24 to the TrueNAS server 192.168.178.100. Adjust the values according to your case.
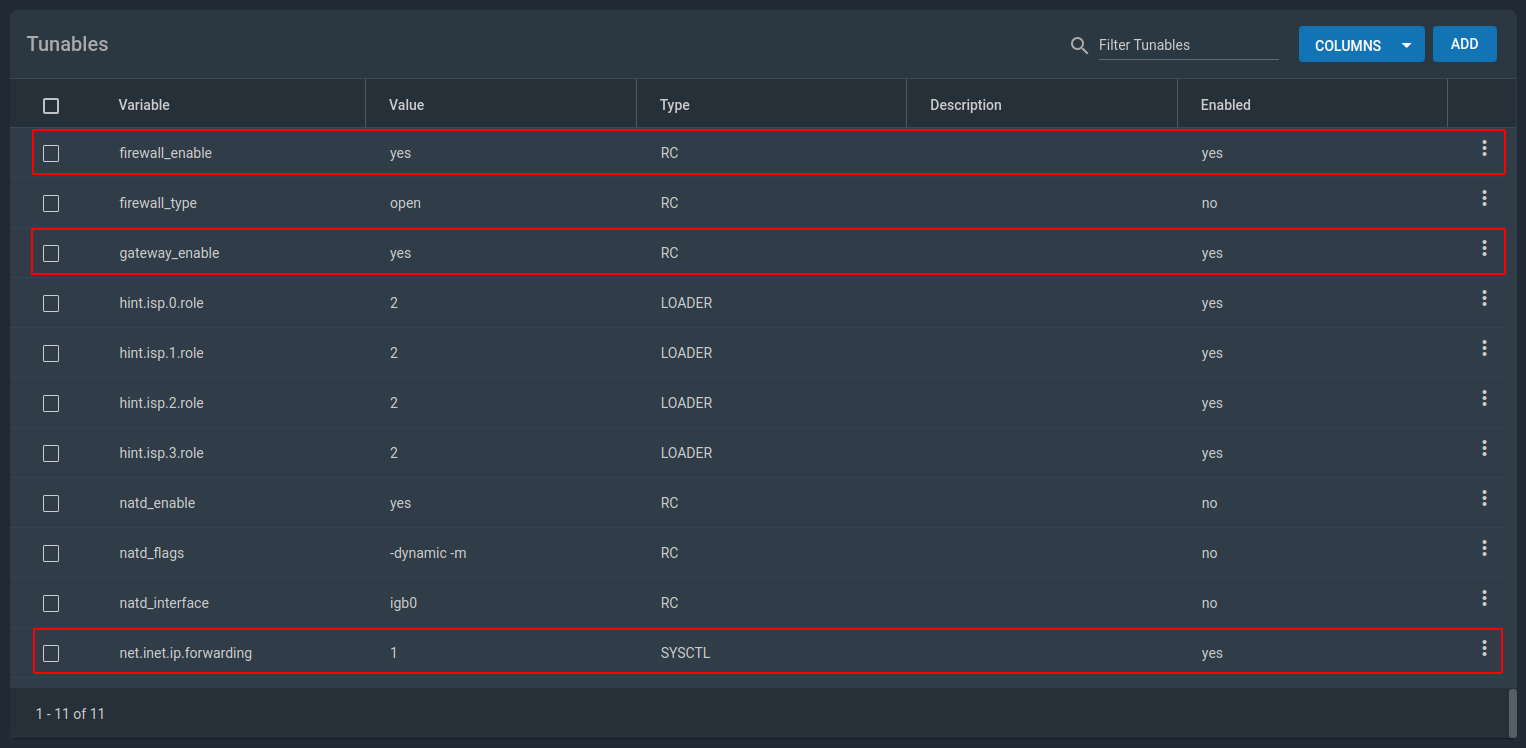
Tunables
Now, some system configuration. Go to System/Tunables. We’ll enable the firewall, the gateway, and IP forwarding.
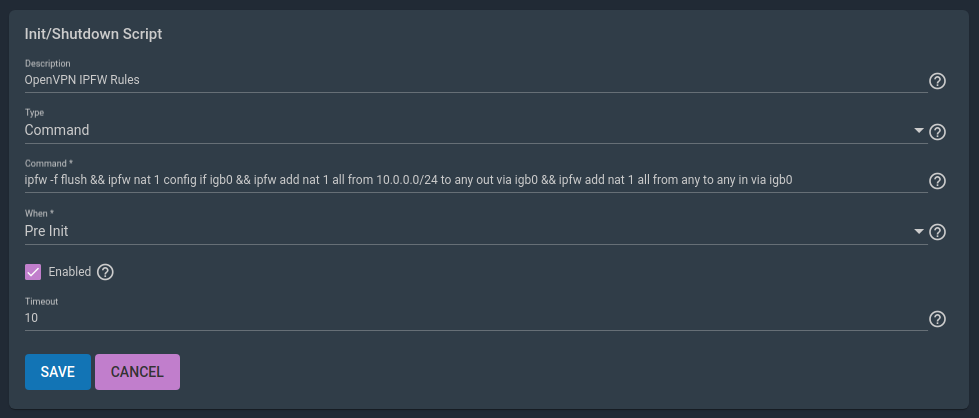
Firewall Rules
Finally, we need to configure a couple of firewall rules. Go to Tasks/InitShutdown Scripts. Click Add and paste the following command as a pre initialization script. igb0 is my ethernet interface and 10.0.0.0/24 is the client subnet. Adjust the values according to your case.
ipfw -f flush && ipfw nat 1 config if igb0 && ipfw add nat 1 all from 10.0.0.0/24 to any out via igb0 && ipfw add nat 1 all from any to any in via igb0
Now, reboot the system and you are good to go.
Conclusion
That should be enough to get your VPN up and running. Obviously, I cannot prove this here, but give it a try and if you get stuck, post a comment below and maybe I can assist.
I’ve been amazed by TrueNAS and its community. People have done tremendous work. Any service you might think of for your home server, and chances are there is already a plugin for it. Thanks to everyone’s contributions, I got my home lab complete. Awesome stuff!