Here we are, after a long pause, taking the next step with Gazebo. This time we look into how we can create simple models and worlds. We’ll see how we can build and modify models in the Gazebo client, where these models should reside, and how to put together a world, first through the GUI and then by manually editing a world file. Once we create our world, we have set the scene for what comes next… but that’s for later. For now, let’s focus on how objects are represented in the world of Gazebo.
Introduction
Whether we live in a simulation or not, both robots and humans, we all exist in a world. When we deliberate the application of an autonomous robot, its operation is assumed within the context of an environment. So before getting started, we have to set up a representative environment which we will use for testing while we develop our robot. In Gazebo, a world is defined in a .world file. A world file contains a single description in the SDF format, which is a unified language that enables to specify robots, sensors, lights, and any kind of objects, all in one place.
This is what a basic world looks like:
<sdf version="1.6">
  <world name="default">
    <include>
      <uri>model://sun</uri>
    </include>
    <include>
      <uri>model://ground_plane</uri>
    </include>
  </world>
</sdf>
we define a world with name “default”, and within this world, we include a ground and a sun. The ground creates a surface at level \(z=0\), which prevents objects from falling for eternity due to gravity, and the sun lights up the world.
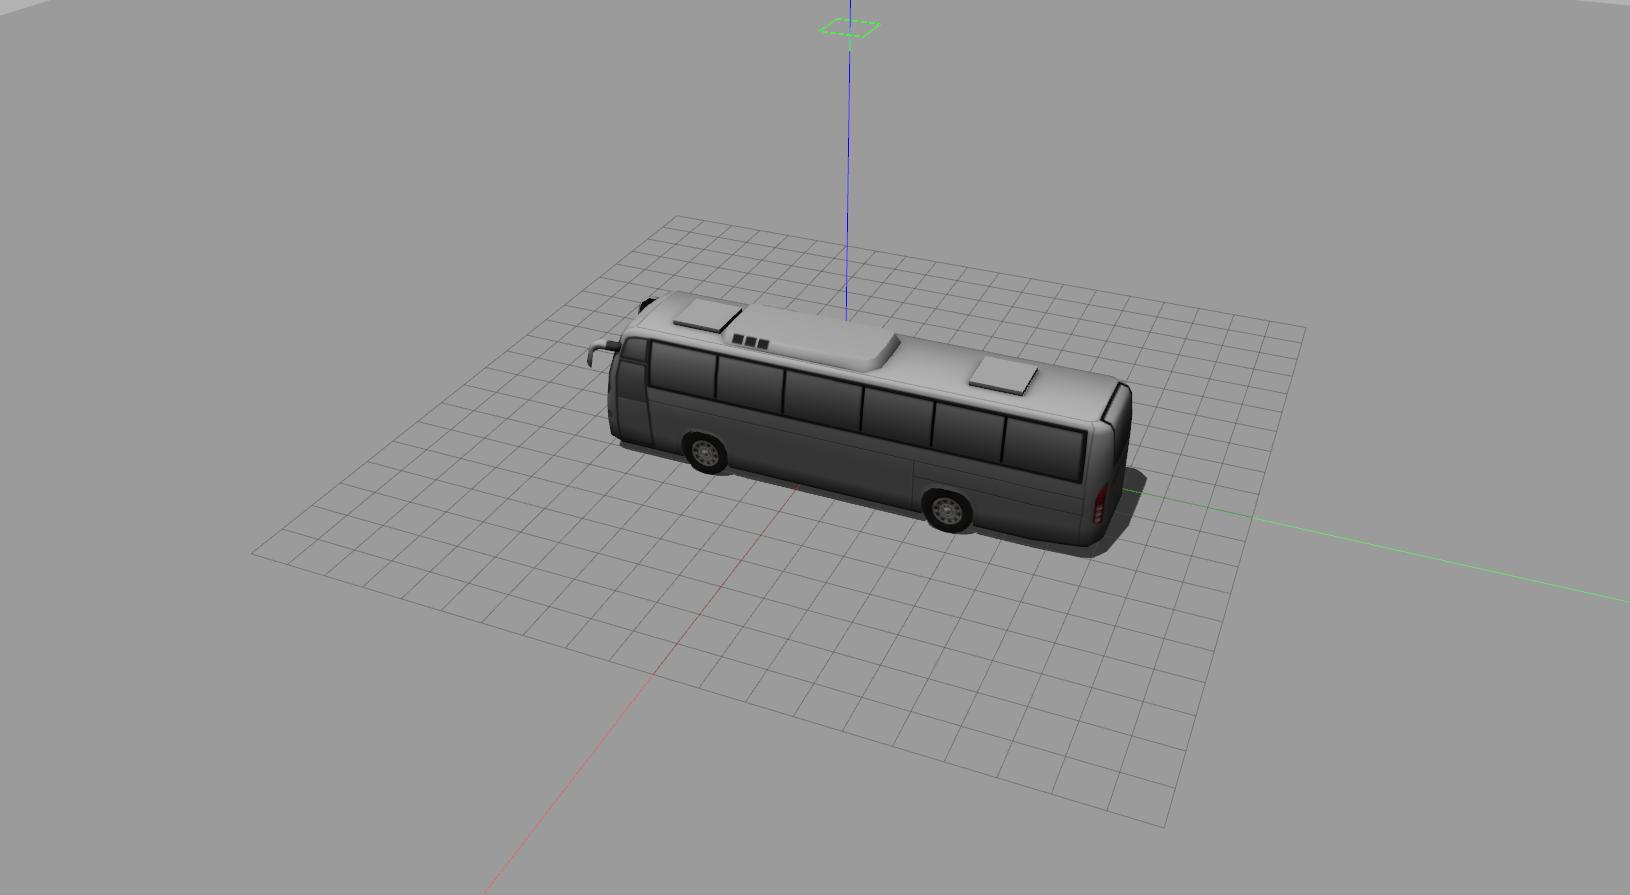
Both the ground plane and the sun are defined as SDF models in Gazebo, and they are referenced here in the world file. In the same way, we can define models for our own objects and use them to populate the world. For example, let’s use one of the existing models, the bus, and spawn it in Gazebo. This model is hosted on the official gazebo models server and it is automatically downloaded in our local ~/.gazebo/models directory the first time it is referenced (so, on that initial launch, it will take some time for the world to be spawned; don’t try to kill gazebo). Now, create ~/bus.world:
<sdf version="1.6">
  <world name="default">
    <include>
      <uri>model://sun</uri>
    </include>
    <include>
      <uri>model://ground_plane</uri>
    </include>

    <include>
      <name>bus</name>
      <uri>model://bus</uri>
      <pose frame=''>2 1 0 0 0 0</pose>
    </include>
  </world>
</sdf>
and then run:
> gazebo ~/bus.world
You should see a bus appear in the world at the \((2,1)\) position.
If we click File > Save World As, a new world file will be created which will contain the state of the entire world at that specific moment (this is all the information that is needed to launch and continue the simulation from that point in time. Gazebo will have expanded and replaced all the include tags in the initial description with the model definitions. There, we can see what the description of the bus looks like, but we can also observe that there are a few more things going on. It may seem tedious or daunting having to work directly with a world file, but it’s really not that complicated once you familiarize yourself with SDF. Nevertheless, we won’t deal with this right now. Instead, we’ll use the Gazebo GUI to build our world.
Before continuing, it’s a good idea to get to know the GUI.
Buildings
Assuming that our robot operates within a building, we must start by recreating the blueprint of that building within Gazebo. When it comes to putting together a building, Gazebo has a graphical building editor which is accessible via Edit > Building Editor.
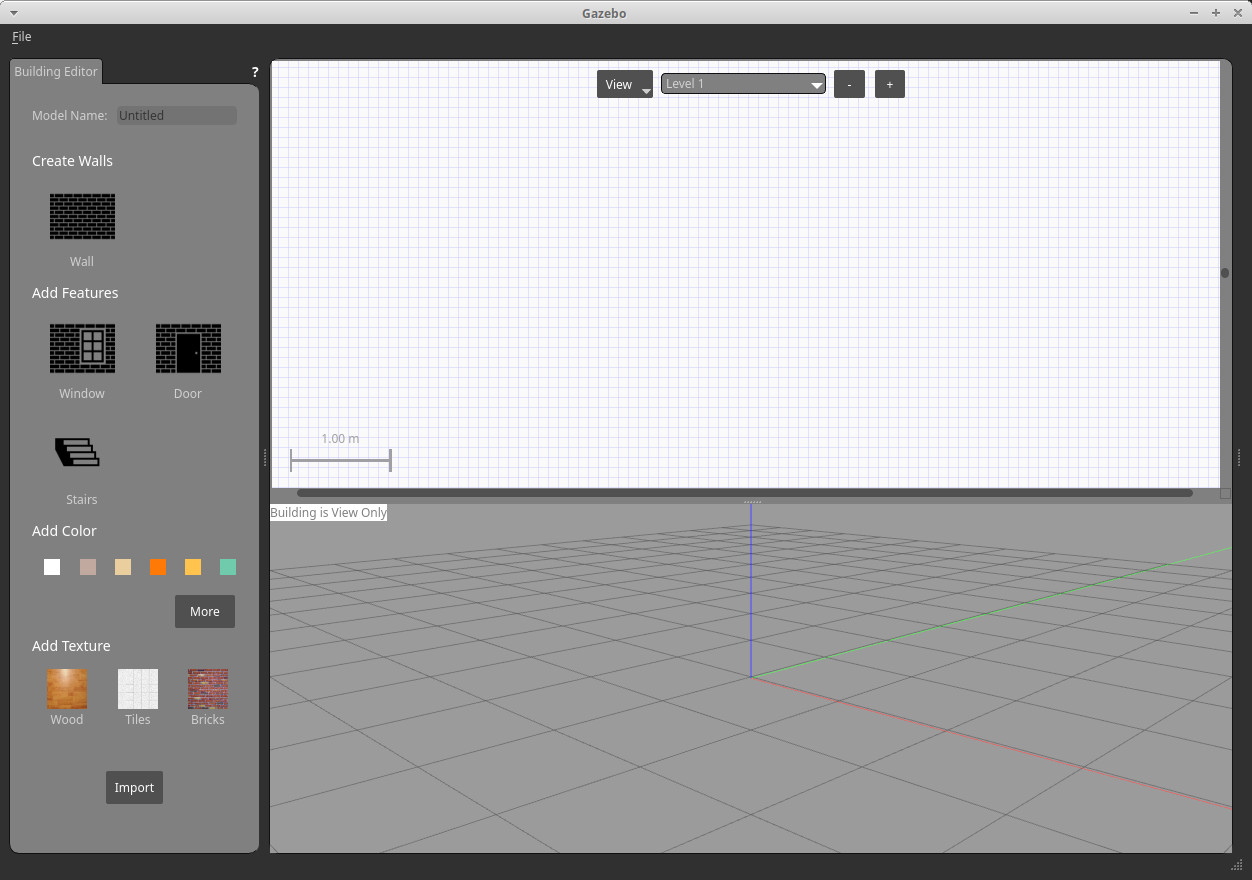
There, we can define walls, doors, windows, stairs, add colors and textures. We won’t go into any details on how to use the building editor, as there is already a tutorial that describes everything. I will only highlight here that you should make sure that you have defined everything you need once you are done. After you exit the editor, you won’t be able to go back and edit things. If you find yourself in that situation, apart from starting over, your only option is to open the SDF description of that building and tweak things manually. For now, let’s keep things simple and create a plain rectangular area.
Models
By adding a building in the world, we define the available space of operation as outlined by the walls of that building. At that point, the space is empty. So, the next step is to populate the space by adding (models of) objects.
One option is to add basic geometric shapes. These are accessible in the upper toolbar of the Gazebo client. We have the choices of cube, sphere, and cylinder.

Pressing any of these buttons creates a unit shape. If we want to change some aspect of that shape, like its size, we can right-click on the model and select Edit model. This will open the Model Editor. In the model editor, we can once again right-click on the model and select Open Link Inspector. It’s link inspector because we actually select a link (in the general case, a model is comprised of multiple links assembled together by joints). In the Link Inspector window, we can set the physical, visual, and collisional properties of the model. The physical properties include the mass, center of mass, inertia, etc, and define how the link moves in the world and interacts with other objects. The visual properties define the features of the geometry that we see, and finally, the collisional properties define the features of the geometry that the physics engine sees. A visual geometry may differ from the corresponding collisional geometry. In practice, we want a visual geometry to be a faithful representation of the real object, as this is what a camera captures. In contrast, we want a collisional geometry to be as simple as possible to minimize the computational load put on the physics engine while calculating the collisions between the different objects in the world.
In the model editor, we can create links, and joints, and gradually put together an entire robot. It’s not particularly useful for a real application, but it’s a gentle way to get started until you get familiar with the SDF format. There is a tutorial that describes the model editor in more detail and takes you through the construction of a simple robot if you want to go this way. But it’s not useful for us now, so we can go back to the simple shape case, modify it, save it, and carry on.
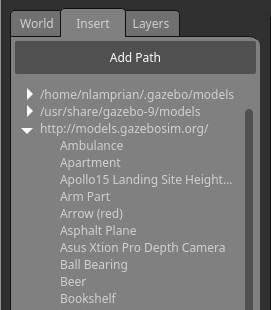
Insert tab on the left panel and expand the http://models.gazebosim.org/ entry, we will get a list of models. When we click on a model name, the model is downloaded on our local model directory ~/.gazebo/models, and then the model can be loaded inside Gazebo.
Of course, the above list is not exhaustive. If we want, we also have the option to create our own models. A Gazebo model consists, at minimum, of a model.config file which contains the model metadata, and a model.sdf file which contains the model description. You can find a bit more information on how to create (and contribute) a Gazebo model here, and how to build an SDF description here. Perhaps, we might have a deeper look into SDF in the future.
Worlds
With models for the building and the objects we want to have inside the building, we can start to create our world. We can do this either through the GUI or by manually creating a world file. Both options give essentially the same result. Depending on your experience, it may be faster to work with one option or the other. But even if you are fluent with SDF, the GUI is still necessary in cases where you cannot calculate the pose of a model by yourself, or you need to set up an initial camera pose. In these cases, you can load the world, manipulate the objects in the scene, save the world in a new file, and then find and copy the relevant information to the initial world file. Let’s start with the GUI here and create an example world with some common objects one would find in a building (subject to the world of your imagination).
As stated before, when we save the world from the GUI, the generated world file contains all information that is necessary to restart the simulation from that moment. But this isn’t what we want. We don’t want the last simulation to affect any future instances. We want to start from scratch. So, we need to remove any state that is stored in the file. Then we need to (or more precisely, can optionally) remove any physics or scene arguments that take default values and don’t need to be explicitly specified. Lastly, remember that all model configurations are expanded, and their description is duplicated inside the world file. We want to remove these model descriptions, and instead, just include the models. This has the benefit that when we load the world, we always get the latest description of the models. Any changes we do to the models are automatically reflected in the world. After executing this step, we end up referencing the models by name. So we have to make sure that Gazebo can find them. Gazebo will search to a few default locations for the models, and if a model is not there, it will search in the online repository, which will result in Gazebo stalling during the loading phase. In other words, any models stored in ~/building_editor_models or ~/model_editor_models that are referenced in the world file have to be moved to ~/.gazebo/models so that we can load the world.
Conclusion
We have seen how, with some simple steps, and without too much effort, we can start creating worlds… from plain walls and basic shapes to fully developed buildings and arbitrary objects. We could even go one step further and make use of plugins for the same purpose. With a plugin, we have the possibility of dynamically loading and unloading environments. This can be useful, for example, in cases where a database holds all the information about your application. You don’t need to create multiple world files with different instances of your environments. You can develop a plugin that reads a database, and on the fly, reconstructs the necessary models and spawns them in Gazebo. Then with a single static world file that only includes the plugin, you can accommodate for all of your worlds.
Next time, we will use the turtlebot to build a map for navigation and have the robot autonomously navigate the world we created above.